
What are User Accounts
At the most simplest form, user accounts are objects in a computer operating system that help track and control access to computer resources, rights and permissions.
What are Resources, Rights and Permissions?
- Resources are hardware or software that allow the computer to perform some task. For example a Web Server is a resource service that allows users to gain access to HTML documents.
- Rights are attached to user account and assigned to an object.
- Permissions are assigned to objects and given to a user.
Rights and permissions explained
A user is giving Read/Write rights to a file. The file has its Read/Write permission altered to give a user access.
How does this apply to the CyberPatriot Competition?
User accounts are always a vulnerability that needs to be mitigated in the competition. To collect the flags on the completion image, you will need to set passwords, change account policies, group settings, and so on.
Windows, Linux, & Cisco
- User Accounts can be configured in all three areas of concern in the CyberPatriots competition.
- Linux and Windows can be configured with both GUI and Command Line.
- Cisco in the real world can be configured using both a GUI and Command line, however for CyberPatriots will only use the command line.
Windows Workstation
If the image is a Windows Workstation, including Windows XP, 7, Vista, 8, & 10, the operating system can be managed using a similar interface.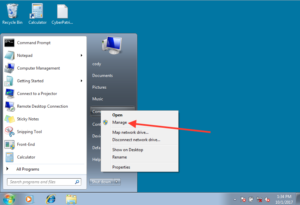
Easiest Method
- Start > Computer
- Right Click on “My Computer”
- Select Manage
Launch from Command Line using “Compmgmt.msc.”
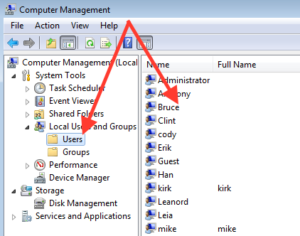
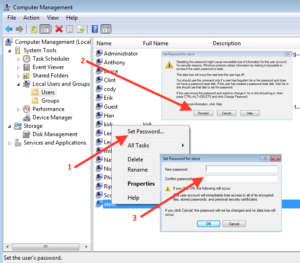
With Computer management open, choose the option for Local Users and Groups, then choose Users. Right click on a User then choose to either Set Password or Properties.
Now that you have the list of users, you can manually set or change any of the settings. However, each setting takes several seconds to complete. If you are setting the password on all the users you will be asked to enter the password in two text boxes and click through two prompts. In the competition we can set all users to the same password. We can more quickly set command by using “Command Line Kung Fu.”
Command Line Kung Fu is the term used in the computer industry for using several commands together to accomplish a task. Using Command Line Kung Fu is not really programming, but some shells like PowerShell and Bash can certainly feel like programming. Here are several good sites where you can discover more about Command Line Kung Fu.
Readme File
As the competition begins, you as a CyberPatriot will first need to read the “Read Me” file. In this file there will be hints as the what accounts need to have which settings or permissions. There will also be notes such as password policies and group memberships. For example, in the Read Me is often a list of authorized users and which users should have remote access and administrative access. Pay attention to your notes and then review the accounts accordingly. Let’s get started and see how to review the account requirements.
The “Read Me” file will often show some information that looks similar to this:
- Authorized Administrators:
- CyberPatriot (you) password is blank
- Anthony password is blank
- Authorized Standard Users:
- Bruce
- Clint
- Erik
- Han
- Leia
- Mike
Please note these are not names from an actual competition, but the list is similar to how the information is presented. Based on clues like these in the “Read Me” file, we can easily identify the accounts we need to delete. So how can we easily delete accounts? Before we delete the accounts, let’s discuss how we can edit accounts using the command line. These commands should work for all versions of Windows that are part of the competition.
net user – Manage Users
The Windows command line has a command called “net”, which contains several sub commands that are used to manage almost all aspects of the network and related functions. Here is a good site that describes several aspects to the net command, net-command
First let’s review command line options for user management.
- List all current users
- net user
- wmic useraccount get name
- Add New Users
- net user <username> /add
- please note the password is blank with this command
- net user <username> <password> /add
- net user <username> /add
- Remove Users
- net user <username> /del
- Enable and Disable a user
- ENABLE – net user <username> /active:yes
- This is the default and assumed if not entered. Re-enable account only
- DISABLE – net user <username> /active:no
- ENABLE – net user <username> /active:yes
Deleting Accounts
GUI Method
Using the GUI, deleting accounts is rather simple. 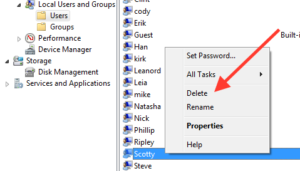 Assuming you still have the Computer Management interface open, you can simply right click on an account, and click delete. When you open the Computer Management MMC, you will most likely have to click through the User Access Control (UAC) menu. Remember editing the system in any way will always require administrator privileges.
This option is ok for deleting accounts, but using the CLI is a little better. If you have to delete 10 accounts, this process could take some time. Where if you learn to do this step as part of the “FixIt” script, then you can make note of all the changes you are about to make. Then execute all the changes at once. In the past some of the forensic questions asked which users are deleted, and the CyberPatriot forgot to write down the account names. Therefore they did not get that flag.
CLI Method 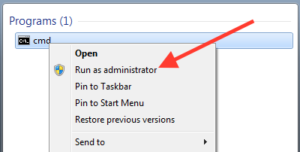
However, deleting accounts from the command line is pretty simple also. When you have many accounts to delete you can script the account deletion. Start the Command prompt as an Administrator, then enter the following command.
 net user <username> /delete
net user steve /delete
Setting Passwords
GUI Method
 The Read Me will make statements similar to “All user accounts need to be password protected.” Using the GUI, the process for setting a password is really simple, but can be time consuming.
- Right Click on the Account and choose “Set Password”
- Next a dialog box will come up and warn you that changing the password for the user could be harmful, click “Proceed”.
- A New dialog box will appear, and provide you the field to type and retype the password.
Follow these steps for each account. Going through this process for the first account is not to be bad. However, when needing to delete several accounts this process can seem to take forever. Getting two prompts for each password takes an enormous amount of time. Using the CLI is better, so lets take a look at the CLI example.
CLI Method
Let’s change all passwords at one time. Can we do that?
Are you ready for some Command Line Kung Fu, well grab on to your hats, this is going to get crazy.
for /f “tokens=1 skip=1” %u in (‘wmic useraccount get name’) do net user %u CyberPatriot!!
Now let’s break down the command to help you understand how to add this command to your “FixIt” script.
- for – Runs a specified command for each file in a set of files.
- wmic – command line interface in windows called Windows Management Interface Console
- wmic useraccount – sub command to get a list of user account names
- net user – command used to modify local users
*** Please note if you are adding this command to a script, please make sure you verify that the “Double Quotes” are straight. With modern browsers and document software the ” is changed so the two single quotes are at a slant. So basically take the command put into “notepad” where no special formatting is used, and replace all the single and double quotes.
*** When putting commands into a batch script with a “%”, you need to escape the “%”. So the for each “%” you need to put at “%%”. for example:
for /f “tokens=1 skip=1” %%u in (‘wmic useraccount get name’) do net user %%u CyberPatriot!!
For loop
- for
- Runs a specified command for each file in a set of files.
- FOR %variable IN (set) DO command [command-parameters]
- /f = Fileset Option
- FOR /F [“options”] %variable IN (‘command’) DO command [command-parameters]
- tokens=x,y,m-n – specifies which tokens from each line are to be passed to the for body for each iteration. This will cause additional variable names to be allocated. The m-n form is a range, specifying the mth through the nth tokens. If the last character in the tokens= string is an asterisk, then an additional variable is allocated and receives the remaining text on the line after the last token parsed.
- wmic useraccount get
- The Windows Management Instrumentation Command-line (WMIC) is a command-line and scripting interface that simplifies the use of Windows Management Instrumentation (WMI) and systems managed through WMI. WMIC is based on aliases.
- Account properties – AccountType, Description, Disabled, Domain, FullName, InstallDate, LocalAccount, Lockout, Name, PasswordChangeable, PasswordExpires, PasswordRequired, SID, SIDType, Status
- wmic useraccount get name – returns a list of users names
- Net User
- Command to set a user’s password
- NET USER <username> <password>
- Example
- net user bob SomeR3longPa$$word
- This sets the password for user “bob” to “SomeR3longPa$$word”
Putting it Together
for /f “tokens=1 skip=1” %u in (‘wmic useraccount get name’) do net user %u CyberPatriot!!
For each entry returned in “wmic useraccount get name” set a variable called %u, Then run the following command net user %u CyberPatriot!!
As you can see the command is somewhat complicated, but as an entry into the using Command Line KungFu this is a great example and easy to dissect. Many of the other commands are far more complicated.
FixIt Script (Set All Passwords)
Let’s change all passwords at one time. Please note, this command works in all versions of Windows both Workstation and Server.
for /f “tokens=1 skip=1” %%u in (‘wmic useraccount get name’) do net user %%u CyberPatriot!!
*** As mentioned before, please note that when using variables in a script within a loop, you need “%%” instead of “%”
Also be careful, as now your account password is also set, and for auto login your account will get locked. So let’s edit the registry and set a password for autologin. This only something we should do for the competition.
REG ADD “HKLM\Software\Microsoft\Windows NT\CurrentVersion\Winlogon” /v DefaultPassword /t REG_SZ /d CyberPatriot!! /f
Windows Workstation Account Policies
Computers have system policies, just a schools have operational policies like a dress code. In this conversation we are going to talk about the computer Security Policies related to user accounts. The policies often discussed for user accounts are:
- Password Policy
- Enforce Password History – This security setting determines the number of unique new passwords that have to be associated with a user account before an old password can be reused. The value must be between 0 and 24 passwords.
- Max Password Age – This security setting determines the period of time (in days) that a password can be used before the system requires the user to change it.
- Min Password Age – This security setting determines the period of time (in days) that a password must be used before the user can change it.
- Min Password Length – This security setting determines the least number of characters that a password for a user account may contain
- Complexity Requirements – This security setting determines whether passwords must meet complexity requirements.
- If this policy is enabled, passwords must meet the following minimum requirements:
- Not contain the user’s account name or parts of the user’s full name that exceed two consecutive characters
- Be at least six characters in length
- Contain characters from three of the following four categories:
- English uppercase characters (A through Z)
- English lowercase characters (a through z)
- Base 10 digits (0 through 9)
- Non-alphabetic characters (for example, !, $, #, %)
- Complexity requirements are enforced when passwords are changed or created.
- If this policy is enabled, passwords must meet the following minimum requirements:
- Account Lockout Policy
- Lockout Duration, Threshold, & Reset Counter
Changing Policy Settings
As with all setting in Windows, the account policy settings can be changed using the GUI or the Command Line, let’s review the GUI method.
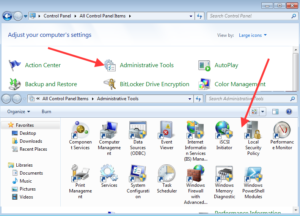
- Open the Control Panel, the select the Administrative Tools
- Next Click on the “Local Security Policy”
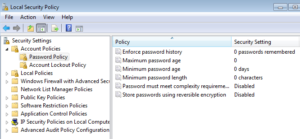
- Next open the Security Settings, and expand Account Policies, then
Password Policies. Now click on each setting and modify the setting accordingly.
Changing Policy Settings (Command Line)
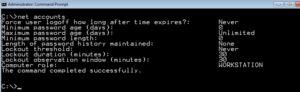
There are 2 methods to change password policies using the command line. For this example we will stick with “net” commands. To review the current Password policy setting run the following command.
net accounts > account_lockout_settings.txt
These settings can be extracted using a simple command. However, all the possible settings are not very clear. Look for the additional opting on at Microsoft’s website, or you can use the examples I provide below.
Listed below are some of the commands to implement a local password policy.
- net accounts /lockoutduration:45 – Lockout Duration
- net accounts /Minpwlen:10 – Minimum Password Length
- net accounts /Minpwage:10 – Minimum Password Age
- net accounts /lockoutthreshold:4 – Lockout Threshold
- net accounts /maxpwage:15 – Maximum Password Age
- net accounts /uniquepw:5 – Unique Password History
These commands will work on Windows Server also. The setting values I selected are not the recommended settings, but just random values I selected. Please review Center for Internet Security (CIS) and Review the United States Government Configuration Baseline (USGCB) hardening guides for best practice settings.
Windows Workstation Group Memberships
Computer systems of all types use the concept of a group. Groups are used to assign a collection of users with same rights to an object. For example if the file permissions on a directory need to be restricted to a collection of users, then a group can be used to perform this task. Remember permissions are properties of an object, like service, file system or application. Therefore users are assigned to a group and then permissions are assigned to the group.
Group memberships can be assigned both using GUI and Command Line, let’s explore.
Managing Groups (GUI)
Windows Workstation, including Windows XP, 7, Vista, 8, & 10 can all be managed using a similar interface.
Easiest Method: 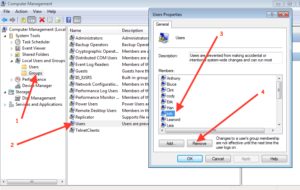
- Start > Computer
- Right Click on “My Computer”
- Select Manage
Launch from Command Line: Compmgmt.msc
With Computer management open:
- Choose the option for Local Users and Groups, the choose Groups.
- Right Click on a Group and select properties.
- After opening the Computer Management, select the Groups list.
- Select the group you would like to edit.
- Next select the user you would like to remove, or in some cases add.
- After selecting add or remove you can follow the screen prompts as presented.
Managing Groups (CMD)
Using the “net localgroup” you can see all the users in each group. But you need to call each group one at a time, which can take just as long as the GUI. But I have a solution for you on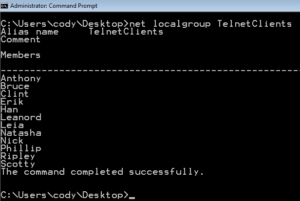 the next slide. Let’s review the commands before you see the commands optimized.
net localgroup <groupname>
net localgroup TelnetClients
Another way to look at the group membership is via the user account itself.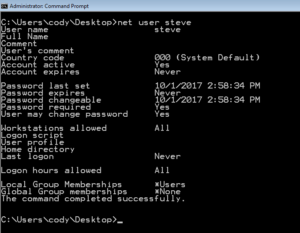 If you run the command “net user <username>” you can see all local groups and global groups the account is a member of. For CyberPatriots we are only concerned with Local Groups.
net localgroup – Manage Group Memberships
- Display all groups
- net localgroup
- Display members of group
- net localgroup <group name>
- Add & Remove Members
- net localgroup <group name> <username> /add
- net localgroup <group name> <username> /del
- Add & Remove Groups
- net localgroup <group name> /add
- net localgroup <group name> /del
Group Membership List Commands
So now that you can use the net command to view groups how does that help you? What if part of your Recon Script could collect all users and the group they belong to, and all groups and the users that belong to them? I think we have a solution for that.
Both of the following commands are pretty advanced, but they can go through the groups and users and provide you with a summary of the group memberships. Please remember if you use these commands in a script you will need to add an extra “%” for each “%i”
Users to Group
for /F “skip=1” %i in (‘wmic useraccount get name’) do @echo. & echo %i >> group_membership.txt & net user %i | find “*” 2>&1 >> group_membership.txt | echo. & echo. >> group_membership.txt
Group to Users
for /F “skip=4 delims=*” %i in (‘net localgroup ^| find /v “The command completed successfully”‘) do @net localgroup “%i” >> local_group_output.txt
I will go through these commands in a separate blog, but for now trust these commands are very useful.
Windows Server – Accounts, Policies, & Groups
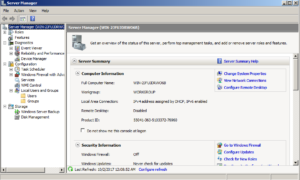
Is Windows Server Different? All of the commands I have shown to this point are the same for Windows Workstation and Server. For Windows Server there is a different shell called Power Shell, but we are going to save that for a later day. The GUI on the other hand is somewhat different, so I will discuss the GUI from this point forward.
- Server Manager
- The Server Manager MMC is where most of the management tasks are completed.
- Local Security Policy
- The Local Security Policy works in the same manner, however there are some additional settings. But for the purposes of the CyberPatriot Competition the Workstation and Server are the same.
As you can tell from the image below, some of the Server Manager looks the same, but there are differences. But for Users and Group the tool works the same.
Ubuntu Accounts, Policies, & Groups
As many of the CyberPatriots I have mentored have noticed, Ubuntu is completely different than a Windows environment. A key thing to remember in Linux is everything treated like a file. There is not a registry, there are just several configuration files. A good Linux system admin knows all the config files for their system. Managing Users, Groups, and passwords are now different. Let’s get started.
Managing Users
- /etc/passwd
- This file contains the initial user information such as primary group id, home directory, default shell and so on.
- /etc/shadow
- This is the file where all the account information is stored, such as password, expire setting, and more.
When managing user accounts you are ultimately editing these files. You can use commands such as cat, sed, and awk to extract and update information in these file.
- This is the file where all the account information is stored, such as password, expire setting, and more.
- Read for yourself
/etc/passwd
jsmith:x:1001:1000:Joe Smith,Room 1007,(234)555-8910,(234)555-0044,email:/home/jsmith:/bin/sh
The fields, in order from left to right, are:
- User name: the string a user would type in when logging into the operating system: the logname. Must be unique across users listed in the file.
- Former Password: in most modern uses, this field is usually set to “x” (or “*”, or some other indicator) with the actual password information being stored in a separate shadow password file.
- user identifier number: used by the operating system for internal purposes. It need not be unique.
- group identifier number: which identifies the primary group of the user; all files that are created by this user may initially be accessible to this group.
- Gecos field: commentary that describes the person or account. Typically, this is a set of comma-separated values including the user’s full name and contact details.
- Home Directory: path to the user’s home directory.
- Shell Program: program that is started every time the user logs into the system. For an interactive user, this is usually one of the system’s command line interpreters (shells).
/etc/shadow
smithj:Ep6mckrOLChF.:10063:0:99999:7:6:5:R
Here is what the fields in the file mean:
- Username: up to 8 characters. Case-sensitive, usually all lowercase. A direct match to the username in the /etc/passwd file.
- Password: 13 character encrypted. A blank entry (eg. ::) indicates a password is not required to log in (usually a bad idea), and a “*” entry (eg. :*:) indicates the account has been disabled.
- The number of days (since January 1, 1970) since the password was last changed.
- The number of days before password may be changed (0 indicates it may be changed at any time)
- The number of days after which password must be changed (99999 indicates user can keep his or her password unchanged for many, many years)
- The number of days to warn user of an expiring password (7 for a full week)
- The number of days after password expires that account is disabled
- The number of days since January 1, 1970 that an account has been disabled
- A reserved field for possible future use
What Next?
We can use the GUI to manage users, but again this is a slow and painful process.
Click in the upper left hand corner of the screen on the Ubuntu symbol. 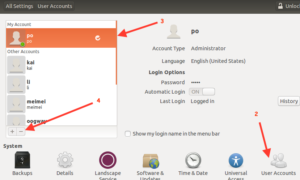 Then select System Tools and System Settings.
Arrow 2 shows the Users Accounts icon, that should be near the bottom under System
Arrow 3 shows the user you have selected and you can see some of the configurable options.
Arrow 4 shows the buttons used to add or remove users.
The primary issue with this interface is you have to re-authenticate with every change. Which can really slow you down. But never fear, we can do this on the command line must faster.
Removed Unauthorized User
From the review of the Read Me file, we can easily see which users are not authorized. The following command can be used to remove the users.
- userdel -r <username>
- The “-r” option removes the directory for the user in the “/home”. This might also get flags for deleting files. This why you don’t what to delete users until you have completed all the recon you are going to do.
- The <username> should be replaced with the valid user names listed in the “usernames.txt” file.
userdel -r bob
Insecure Password
Password usage is always part of the competition. This command allows for you to change all the passwords really fast.
awk -F”:” ‘$2 !~ “\*|\!” {system(“usermod -p $(openssl passwd -1 <new password>) “$1)}’ /etc/shadow
The command loops through the shadow file, then uses a system call and the openssl command to create the proper encryption string.
awk -F”:” ‘$2 !~ “\*|\!” {system(“usermod -p $(openssl passwd -1 SomeNewPassword!2) “$1)}’ /etc/shadow
User is not an Administrator
There is a file called “/etc/group” where all group memberships are stored. While reading this file is easy to do, you can’t easily see the list from a user perspective.
gpasswd -d <username> <groupname>
gpasswd -d bob sudo
Ubuntu – Search key groups
Search key groups for users with administrative access.
cat /etc/group | egrep ‘(\broot)|(\badmin)|(\badm)|(\bsudo)’
We use 2 new commands
- cat – concatenate files and print on the standard output
- egrep – print lines matching a pattern
Here is the example

Group memberships are stored in the /etc/group file. Here are the field definitions:
adm:x:4:student,lobsang,verence
- group_name: It is the name of the group. If you run ls -l command, you will see this name printed in the group field.
- password: Generally password is not used, hence it is empty/blank. It can store encrypted password. This is useful to implement privileged groups.
- Group ID (GID): Each user must be assigned a group ID. You can see this number in your /etc/passwd file.
- Group List: A list of user names of users who are members of the group. The user names must be separated by commas.
cat /etc/group | egrep ‘(\broot)|(\badmin)|(\badm)|(\bsudo)‘
Let’s break down the commands:
- cat – The command will print the content of a file to the screen.
- cat /etc/group will print the file to the screen.
- Using the “|” pipe, we can redirect the output to the another command.
- cat /etc/group | egrep ‘(\broot)|(\badmin)|(\badm)|(\bsudo)’
- egrep PATTERN [FILE]
- This command uses regular expression, known as regex,
- The pattern is enclosed in single quotes.
- PATTERN = (\broot)|(\badmin)|(\badm)|(\bsudo)
- (text) = groups the characters together
- \b = work boundary
- root, admin, adm, sudo = names of groups
- FILE = /etc/group
Putting the command together.
cat /etc/group | egrep ‘(\broot)|(\badmin)|(\badm)|(\bsudo)’
Now we can edit the /etc/group file with the SED command.
sed -ir ‘s/OLD_LINE/NEW_LINE/’ /etc/group
- SED – stream editor for filtering and transforming text
- -i = edit files in place (makes backup if extension supplied)
- -r = use extended regular expressions in the script.
- enclose expression in single quote
Sample Command
sed -ir ‘s/sudo:x:27:student,lobsang,teppic,verence/sudo:x:27:student,lobsang,teppic/’ /etc/group
Let’s break the SED command down.
- sed -ir ‘s/OLD LINE/NEW LINE/’ /path/to/file
- sed = Stream Line Editor
- more helpful information can be found here – http://www.grymoire.com/Unix/Sed.html
- sed -ir ‘s/OLD LINE/NEW LINE/’ /path/to/file
- SED uses a regular expression (regex) to match an old value with a new value
- In this example the old value is: sudo:x:27:student,lobsang,teppic,verence
- sed -ir ‘s/OLD LINE/NEW LINE/’ /path/to/file
- The regex needs the value to replace the old, and in this example the new value is
- sudo:x:27:student,lobsang,teppic
- sed -ir ‘s/OLD LINE/NEW LINE/’ /path/to/file
- The last parameter is the file you are going to edit.
Now It’s Your Turn
There is a lot of information on the page, and I will add more over time. I encourage you to look up information I talk about in this blog to allow you to better use these commands in the competition.
Hi, this is a comment.
To get started with moderating, editing, and deleting comments, please visit the Comments screen in the dashboard.
Commenter avatars come from Gravatar.